Integrate with Dynamics CRM Online using Web API

Build a REST service layer as an integration point to CRM
Why integration
The Enterprise Information System is like modern warfare, both are composed of highly sophisticated elements. In the modern battlefield, simply adding new weapons like stealth aircraft can not win a war, situational awareness with information sharing, and collaboration between military assets from ballistic missile submarines to special forces on the ground is the “game changer”. In the current business environment, to gain an edge, just implementing a top-rank application like Dynamics CRM is not enough, the key is to collaborate with vital business data to help business users to make informed decisions.
In military terms, it is called “Network Centric Warfare”, in Business, it is called Integration.
Integration with CRM
Recently I have been working on a project to integrate Dynamics CRM into an Enterprise Service Bus system. I found the process of integration to CRM as a whole is not well documented for beginners, the purpose of this article is to share my experience in building a REST service layer as an integration point to CRM 2016.
Scenario
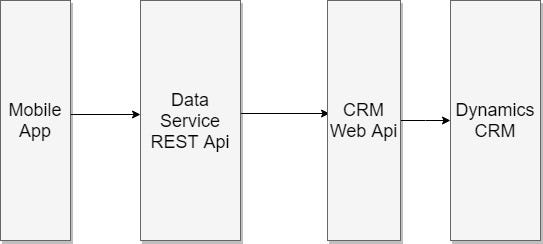
To illustrate the integration process, let’s assume a company recently implemented Dynamics CRM 2016. The sales team wants to integrate an enterprise mobile app with CRM. The Mobile app will retrieve client contacts from CRM, so salesmen can contact the client. Salesmen may also post new leads to CRM. After the lead is posted, the default workflow will be activated to process the lead.
The Solution
The above scenario requires the mobile app to retrieve data from and write data to CRM. A REST service layer is introduced to provide a facade to CRM Web API. By using the REST layer as the integration point, we encapsulate the details of connecting to Web API, thus if there is any change in the future version of CRM, the REST service is the only place that needs to be updated.
The canonical data model is applied in the REST Service layer to provide a common data format. The following code snippet illustrates this approach with the leads entity data model.
1 | /// <summary> |
Dynamics Server-to-Server (S2S) Authentication
The REST service needs to authenticate to CRM first before it can connect to Web API, S2S is used because it is secure and doesn’t need to use a paid Dynamics 365 user license. As illustrated in the diagram below, an application user account is created and associated with a custom security role, rather than user credentials, the application is authenticated based on a service principal identified by an Azure AD Object ID value which is stored in the created application user account. Please note that S2S authentication is only available to CRM Online.
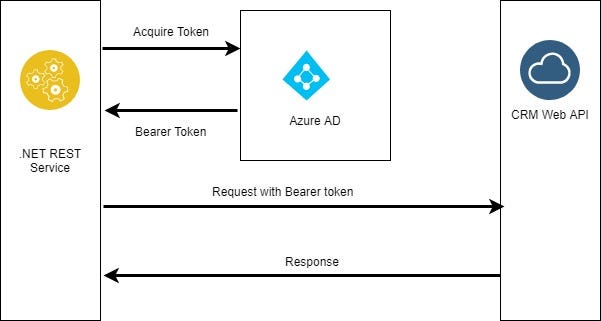 CRM 2016 S2S Authentication
Setup S2S
Registering the App in Azure to get ClientID and Client Secret
- Add a new application registration in Azure portal with your Dynamics CRM subscription. After saving, a new Application ID should be shown.
- Select the registered app just created, add new Settings/Key and copy the value of the Key
- Go to Required Permissions, Add “Dynamics CRM online” and tick “Access CRM online as organisation users”
After completing the above steps, you should have the following keys
ApplicationID(ClientID): generated in Step 1
Client Secret: generated in Step 2
TenantID: go to Azure Active Directory -> Properties -> Directory ID
AADInstanceUrl: https://login.microsoftonline.com
OrganizationUrl: CRM online root Url, i.e. https://[your org name].api.crm6.dynamics.com/
Create CRM Application User and Security Role
- Go to CRM > Security Roles, create a new Security Role
- Create a new CRM application user, and enter the Application ID obtained in the previous step. Note: Select “Application Users” before clicking on “New” button.

- Assign the newly created user with the custom security role created in step 1.
Now we should be able to use the ADAL Nuget package, to obtain the Access Token.
1 | **protected** **async** Task<**string**> GetAccessToken() |
Read data from CRM
After obtaining the access token, it needs to be added to the HTTP request header.
1 | var client = new HttpClient(); |
Retrieving data from CRM is simply a Get HTTP request via OData. To retrieve a contact entity, the request looks like the one below. Please note that this example will return every field in the contact record, which is not a good practice, in real-life cases, $Select should be used to only return the data you need.
1 | GET http://[Organization URI]/api/data/v9.0/contacts(9cdbf27c-8efb-e511-80d2-00155db07c77) |
To retrieve a list of options set, the request looks like below
1 | GET http://[ORG URI]/api/data/v9.0/ |
In REST Service, the Get HTTP Request is sent using HttpClient, and the response will be received and deserialized.
1 | var client = new HttpClient(); |
Write Data to CRM
To create an entity in CRM, we use a POST request. The following code snippet is simplified for illustration purposes only.
CRMLeadModel leadModel = **new** CRMLeadModel()
            {
                firstname = leadDto.FirstName,
                lastname = leadDto.LastName,
                middlename = leadDto.MiddleName
            };
**var** leadUrl = $"[Organization URI]/api/data/v9.0/leads";

HttpContent content = **new** StringContent(JsonConvert.SerializeObject(leadModel), Encoding.UTF8, "application/json");
var client = new HttpClient();
**var response = await** client.PostAsync(url, content);
The response header contains the Uri of the newly created entity.
You can create multiple related entities in a single operation by defining them as navigation properties values. For example, the following Lead Entity contains an object property of the single-valued navigation property PrimaryPreference, when the Lead entity is posted, it will create a lead entity as well as Perference entity.
CRMLeadModel leadModel = **new** CRMLeadModel()
            {
                *PrimaryPreference = new CRMPreferenceModel(){
                  // populate the preference model properties
                 }
*            }*;*
Activate a Process flow in CRM
In Dynamics CRM 2016, the new “SetProcessRequest” is introduced to allow the setting of default business process flow. In this demo, after a salesman post leads to a CRM, we want to activate the default workflow associated with the Lead entity.
Firstly, to get the default workflow Id, we use the following OData call:
[ORG URI]/api/data/v9.0/workflows?$filter=primaryentity eq 'lead'
To set the BPF, two parameters: New Process and Target need to be passed to the request as the following code snippet.
**var** setProcessAction = **new** SetProcessAction();
setProcessAction.target = **new** Target()
            {
                leadid = leadId,
                odatatype = "Microsoft.Dynamics.CRM.lead"
            };
setProcessAction.newprocess = **new** NewProcess()
            {
                workflowid = wrokflowId,
                odatatype = "Microsoft.Dynamics.CRM.workflow"
            };
 **var** qualificationUrl = $"[ORG URI]/api/data/v9.0/SetProcess";
The result of the above SetProcessRequest is that the BPF is activated for the newly created lead entity.
Devil is in the details
A few little tricks/trips that will make your integration journey easier.
Navigation properties
CRM 2016 Web Api support OData V4, one of the very useful feature is the navigation properties which allow you to retrieve or update data associated with the current entity. In the HTTP Request Content, it needs to be used with @odata.bind annotation. For example, the “parentcontactid” field in Lead Entity is a lookup to contact entity, the JSON representation of the field in HTTP request is like below
"parentcontactid@odata.bind": "/contacts(735bea55-a421-e811-a830-000d3ae09197)"

// To serialize the JSON name with @, we need to use the JSONProperty attributes
[JsonProperty("parentcontactid@odata.bind")]
Tools
CRM REST builder is a great tool when working with Web API. It is a code generator that creates JavaScript to perform actions against CRM’s REST endpoints. It installs as a managed solution in your organization so you’ll get the benefit of working with the entities and attributes that you’ve created.
jlattimer/CRMRESTBuilder
CRMRESTBuilder - A tool for CRM 2011/2013/2015/2016/365 Online & On Premise to generate JavaScript code using the 2011…github.com
English like Plural
You may already have noticed that when querying with CRM API, you need to add “s” to the entity name. but there are exceptions, for example, anything ending in “s” is pluralized as “ses”, and “y” is pluralized as “ies”. so the following request will return a “Resource not found” error.
https://[ORG URI]/api/data/v9.0/opportunitys
The correct OData call is
https://[ORG URI]/api/data/v9.0/opportunities
Enjoy your journey in CRM integration!
- Title: Integrate with Dynamics CRM Online using Web API
- Author: Sunny Sun
- Created at : 2019-10-05 11:14:56
- Updated at : 2024-07-07 18:35:23
- Link: http://coffeethinkcode.com/2019/10/05/integrate-with-dynamics-crm-online-using-web-api/
- License: This work is licensed under CC BY-NC-SA 4.0.